Friday, April 29, 2016

Policy add using Rest API in WSO2 EMM

You can add a policy using REST API given in EMM. For the use the dynamic registration client given.
below sample curl command will return client id and secret


curl -k -H "Content-Type: application/json" -X POST -d '{"owner":"admin","clientName":"admin_emm","grantType":"refresh_token password client_credentials","tokenScope":"prod"}' https://localhost:9443/dynamic-client-web/register

This will return a response like below

{"client_secret":"YCnfi_jp9Tso0qyRcbGxaQnYctga","callback_url":null,"client_id":"xJvKvUHNYqfK1MeQ_VybtBfF5MAa","client_name":"admin_admin_emm"}

Use the client id and secret by encoding using base64 to generate access token using below command

curl -k -d "grant_type=password&username=admin&password=admin&scope=default " -H "Authorization: Basic eEp2S3ZVSE5ZcWZLMU1lUV9WeWJ0QmZGNU1BYTpZQ25maV9qcDlUc28wcXlSY2JHeGFRblljdGdh" -H "Content-Type: application/x-www-form-urlencoded" https://localhost:9443/oauth2/token

This will return a response like below

{"scope":"default","token_type":"Bearer","expires_in":3600,"refresh_token":"97c3c78b8c2c4e2ccd5424ffc7259d3e","access_token":"60a810d5baa3361af9aa5e6d8cf76ea9"}

Use the generated access token to call the policy publishing API. 

Below is a sample curl command to create black list policy

curl -X POST -H "Content-Type: application/json" -H "Authorization: Bearer 60a810d5baa3361af9aa5e6d8cf76ea9" -d @'operation.json' -k -v https://localhost:9443/mdm-admin/policies/active-policy


Resource path  : /active-policy
URL : /mdm-admin/policies/active-policy
HTTP Method : POST
Request/Response format : application/json

Sample payload in operation.json is 

{
  "policyName": "black list",
  "description": "",
  "compliance": "enforce",
  "ownershipType": "ANY",
  "profile": {
    "profileName": "black list",
    "deviceType": {
      "id": 1
    },
    "profileFeaturesList": [
      {
        "featureCode": "APP-RESTRICTION",
        "deviceTypeId": 1,
        "content": {
          "restriction-type": "black-list",
          "restricted-applications": [
            {
              "appName": "app name1",
              "packageName": "package1"
            },
            {
              "appName": "app name2",
              "packageName": "package2"
            },
            {
              "appName": "app name3",
              "packageName": "package3"
            }
          ]
        }
      }
    ]
  },
  "roles": [
    "ANY"
  ]
}


After making above curl command you will get successful response as below

*   Trying 127.0.0.1...
* Connected to localhost (127.0.0.1) port 9443 (#0)
* TLS 1.2 connection using TLS_ECDHE_RSA_WITH_AES_128_CBC_SHA256
* Server certificate: localhost
> POST /mdm-admin/policies/active-policy HTTP/1.1
> Host: localhost:9443
> User-Agent: curl/7.43.0
> Accept: */*
> Content-Type: application/json
> Authorization: Bearer 60a810d5baa3361af9aa5e6d8cf76ea9
> Content-Length: 460
* upload completely sent off: 460 out of 460 bytes
< HTTP/1.1 200 OK
< Date: Fri, 29 Apr 2016 11:19:39 GMT
< Content-Type: application/json
< Content-Length: 76
< Server: WSO2 Carbon Server
* Connection #0 to host localhost left intact
{"statusCode":201,"messageFromServer":"Policy has been added successfully."}

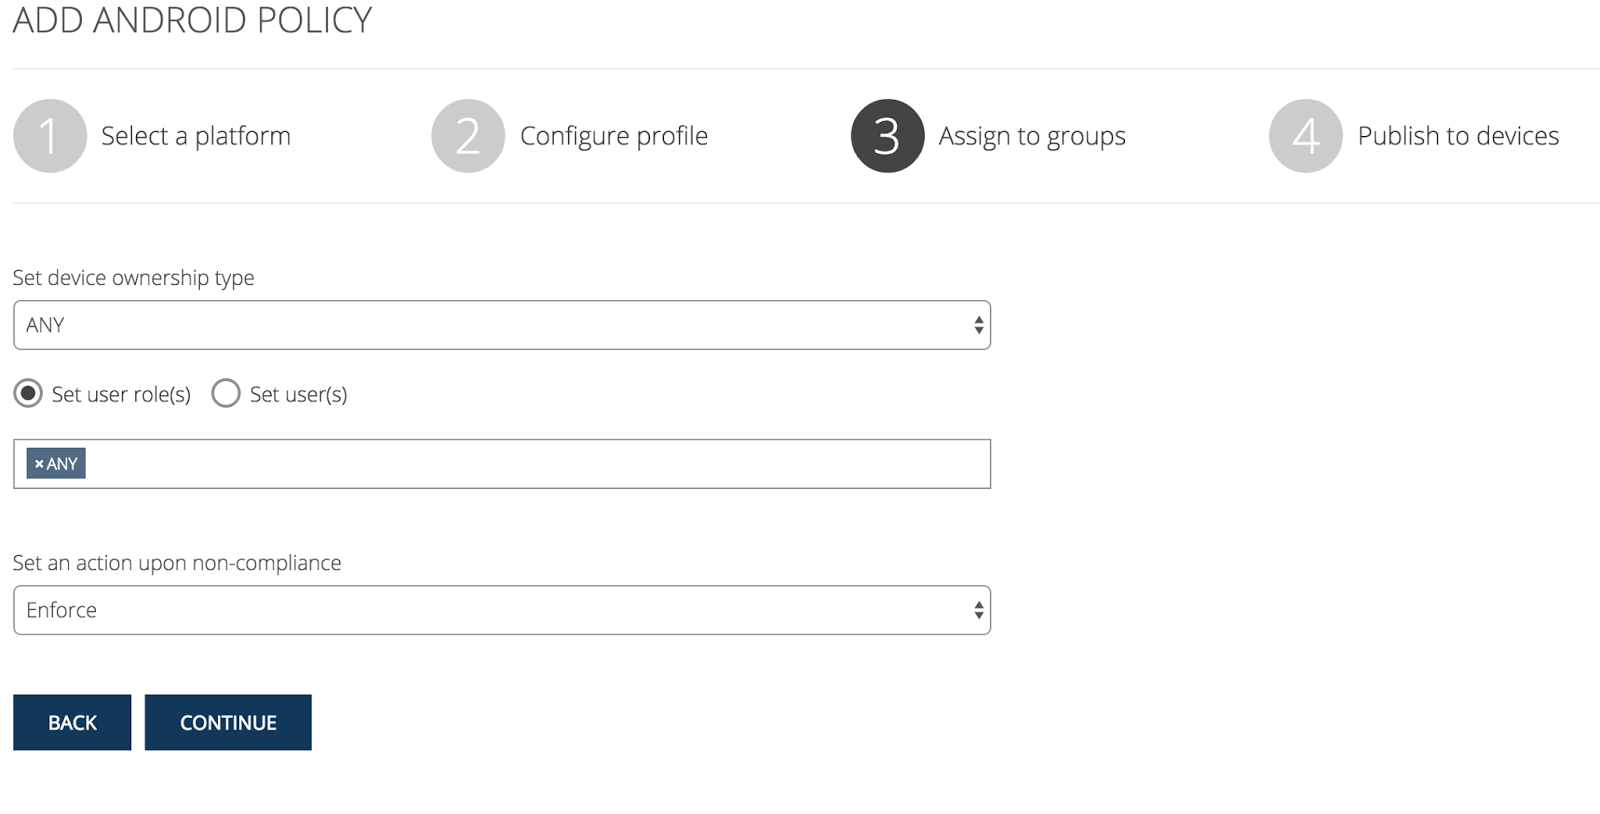
Created policy bundle will show in policy management window of EMM UI.

Wednesday, April 27, 2016

Application Whitelist and Blacklist Feature in WSO2 EMM

It can be white listed and black listed applications in WSO2 EMM 2.1.0 onwards.

What is Application White List?
White listed applications are the only applications that allowed run on device. Any other application which does not appear on the list will not be allowed to run on the device.
What is Application Black List?
Black listed applications are the applications that are not allowed to run on the device.

Application black lists and white lists can be deployed on devices as device policies. Follow the below steps to create black list.

1. Enroll a device on EMM.
2. Create an app restriction policy
  i) Go to the EMM main window by issuing below url to the browser address bar
      https://localhost:9443/emm/
  ii) Click policy add button as shown in below

iii) Choose the platform. ex : I choose android platform.


iv) Click Applications Restrictions profile and click Off toggle button to On the profile


v) Choose black list from select box and add applications as below. Note that to add a description about the application in App Name/Description column and to add the package name of the application in Package Name column. Click continue button.


vi) Select device owner type, user or role and policy action level from current wizard

vii) Type a policy name and description about policy and click publish to Device button from current wizard


viii) Now click the policy view button and you will redirect to below page.


ix) Now click the APPLY CHANGES TO DEVICES button to change take effect as below.


You can follow the same steps as above to create a white list as well.


Thursday, April 7, 2016

WSO2 APP Manager(APPM) and WSO2 Enterprise Mobility Manager (EMM) integration

There are two separate cases for APPM and EMM integration

1. APPM and EMM on a single JVM. ex : EMM standalone pack.
2. APPM and EMM on separate JVMs. ex : clustered scenario

For the first case, EMM standalone vanilla pack should work without changing any configuration.

For the second case, There are some configurations which should be done. Follow the below steps to configure APPM and EMM on separate JVMs.

1. If you run APPM and EMM on same machine change the port offset of one pack. Let's change the port offset of APPM pack.

i) Change the port offset of carbon.xml to 10 which is in <APPM_HOME>/repository/conf directory.
ii) Since APPM default authentication mechanism is SAML SSO change the port of IdentityProviderUrl also in app-manager.xml

 ex : Change the port as shown in light green

<SSOConfiguration>

        <!-- URL of the IDP use for SSO -->
        <IdentityProviderUrl>https://localhost:9453/samlsso</IdentityProviderUrl>

        <Configurators>
            <Configurator>
                <name>wso2is</name>
                <version>5.0.0</version>
                <providerClass>org.wso2.carbon.appmgt.impl.idp.sso.configurator.IS500SAMLSSOConfigurator</providerClass>
                <parameters>
                    <providerURL>https://localhost:9453</providerURL>
                    <username>admin</username>
                    <password>admin</password>
                </parameters>
            </Configurator>
        </Configurators>

    </SSOConfiguration>

iii) Change the port offset to 9453 for all the ports found in sso-idp-config.xml which is located in <APP_HOME>/repository/conf/identity directory.

Now setting port offset is done.

2. Now create a mobile app by going to App Manager publisher. publish it and it will be available in APPM store.
3. Create an OAuth application in EMM by following article How to map existing oauth apps in wso2.
4. Open the app-manager.xml in APPM and find for a configuration called MobileAppsConfiguration. change ActiveMDM property to WSO2MDM.

ex: <Config name="ActiveMDM">WSO2MDM</Config>

Change the MDM properties named as WSO2MDM as follows. Change the port to EMM port of ServerURL and TokenApiURL. Here client key and client secret is which returned from EMM when OAuth application is created.

<MDM name="WSO2MDM" bundle="org.wso2.carbon.appmgt.mdm.restconnector">
                <Property name="ImageURL">/store/extensions/assets/mobileapp/resources/models/%s.png</Property>
                <Property name="ServerURL">https://localhost:9453/mdm-admin</Property>
                <Property name="TokenApiURL">https://localhost:9453/oauth2/token</Property>
                <Property name="ClientKey">veQtMV1aH1iX0AFWQckJLiooTxUa</Property>
                <Property name="ClientSecret">cFGPUbV11yf9WgsL18d1Oga6JR0a</Property>
                <Property name="AuthUser">admin</Property>
                <Property name="AuthPass">admin</Property>
            </MDM>

5. Enrol your device in MDM.
6. Now you can install apps using app manager store to devices enrolled in EMM.


Monday, April 4, 2016

Hide asset types feature in WSO2 App Manager

In WSO2 App Manager 1.2.0 (currently on development) onwards, there is a feature to hide specific app types from publisher and store. There is a configuration in app-manager.xml which located in <APP_Manager_HOME>/repository/conf directory, called EnabledAssetTypeList.

If you want to hide web app and sites, comment the relevant asset types from this configuration as shown in below and restart the server

<EnabledAssetTypeList>
<!--<Type>webapp</Type>-->
<Type>mobileapp</Type>
<!--<Type>site</Type>-->
</EnabledAssetTypeList>


Sunday, January 24, 2016

How to map existing OAuth applications in WSO2 API Manager User Interface

You can create OAuth applications using OAuthAdminService admin service. You can follow the below steps to see how mapping of existing OAuth applications via store UI works.

1. Change the mapExistingAuthApps property value to true in <APIM_HOME>/repository/deployment/server/jaggeryapps/store/site/conf/site.json file.
2. Change the HideAdminServiceWSDLs property to true in <APIM_HOME>/repository/conf/carbon.xml file.
4. Restart API Manager instance so that to take effect the changes in carbon.xml
3. Create a project in SOAPUI with following URL
     https://localhost:9443/services/OAuthAdminService?wsdl
4. Get the request window for registerOAuthConsumer operation and make a request as the below picture depicts.

When you make a request, it will create a OAuth application in API Manager.

5. Now go to the my subscription page in store. You can see Provide keys button next to Generate keys button.

 6. Now click the Provide keys button and give the consumer key and secret generated as the response in 4th step as shown below.

7. Click the save button. After save button clicked access token will automatically generated. You can click the regenerate button to regenerate access token for this OAuth Application.

How to choose IP address range for resources for AWS virtual private cloud

You will often need to allocate  an IP address range when you design the network of an AWS VPC. Since VPC is a small network of resources(E...